Unity 3D for Motion Design: Recording Output

The potential for Unity in traditional digital video environments is very strong. There are things the engine does intuitively that are either overly complicated or just impossible to achieve (at least, without numerous third-party plugins) in traditional 2D motion design software like After Effects.
These tools won’t do you any good in a motion design pipeline if you can’t output your playback to a professional intermediary video format. In other words, Camtasia ain’t gonna cut it.
Luckily, Unity Recorder 2.5 (stable release added to 2020 LTS as of December 2020) offers an ideal solution, but it does require a little digging to find and add it into your project, which might trip up newer users. I’m going to cover how to install Unity Recorder as well as the various outputs, options and their differing utility.

Install Unity Recorder
Unity Recorder is not automatically installed when you create a new project, so your first objective is to locate it in the Package Manager. If you already know how to find and install packages from the Package Manager, you can skip ahead to the next section.

When you first open the Package Manager, it will show what you already have installed. Select “Unity Registry” from the “Packages:” dropdown to see what’s available to you, then scroll down or use the search bar to find and install Unity Recorder.


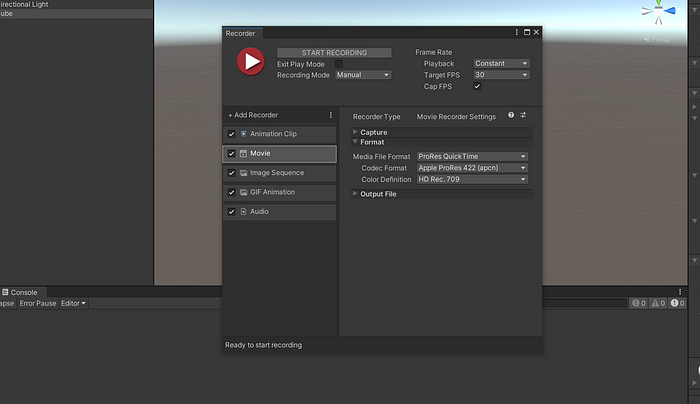
Installation should take a few minutes, then you’re ready to get started recording. Once installed, you can access the Recorder dialog window from the Window -> General-> Recorder tab.

Note that you will have to repeat this process for every new Unity project you start.
Unity Recorder Settings and Options
Before we add our first recorder, we have a couple global options to address that will affect each recording type.

On the left-hand side, “Exit Play Mode” will determine whether Play mode stops upon ending the recording. It defaults to off, but in most cases it’s likely you’ll want this option turned on.
You’ll set your frame rate on the right-hand side. For our purposes, we’ll generally want to set it to Constant with a Target FPS that matches our video specs. Toggling “Cap FPS” will ensure that the recording doesn’t exceed our desired frame rate.
Next, click “Add Recorder” and select your output type.
Capture Settings
Depending on your output format, you will have several capture options:
- Select from the Game View, a specific camera (Targeted Camera), cube-mapped 360°, or a specific texture (Render Texture Asset)
- 360° View lets you set the cube map dimensions and resolution, as well as whether or not to render the output in VR-ready stereoscopic mode
- Setting multiple recorders to Render Texture Asset, each set to a different texture, will allow you to approximate texture multipasses. For more traditional multipass functionality, find and install the Unity AOV Recorder package
- Use “Texture Sampling” to record supersampled and anti-aliased textures from a specific scene camera
Output Resolution, Flip Vertical, Include Audio and Camera should be self-explanatory.
Movie
The movie recorder will allow you to capture one of three formats: MP4 encoded to h264, MOV in ProRes and WebM VP9. For this, we’ll focus on MP4 and MOV.
Exporting MP4 is a convenient way to quickly share WIP with teammates or clients. The format options are light: High, Medium or Low quality, which roughly equates to the same bitrate target settings in Adobe Media Encoder’s parallel presets.
ProRes will let you select the full range of codec options, from 422 Proxy to 4444 XQ. Currently the only available color space is Rec. 709. ProRes can be used as an intermediary format (be sure to select a 4444 codec if you need to preserve alpha), but for compositing we might prefer one of the option from the following recorder.
Image Sequence

Output your recording as a sequence of JPEG, PNG or OpenEXR images. Note that to preserve the alpha channel you need to be in Targeted Camera capture mode and select either PNG or EXR.
You will also need to include a separate Audio recorder to capture and sync your scene audio.
Audio
Predictably, the audio recorder only captures audio events in your scene. Currently the only output format available is WAV.
GIF Animation

Best for quick WIP shares or process documentation, you can also directly export GIFs from Unity Recorder. Keyframe interval will determine how frequently the color pallette (set in “Num Colors”) refreshes, while Max Tasks will limit the number of processor cores used to render frames in parallel.
Animation Clip
This is the format I am least familiar with. Theoretically, you could use this to convert a GameObject’s behavior into a .anim file that could then be used as a repeatable animation in Unity’s Animator, but it probably has the least amount of utility from a motion design standpoint.

If you’ve written an article detailing the .anim workflow coming out of Unity Recorder, please post it in the comments and I’ll add it as a link for anyone who is curious about it.
Output File
Regardless of the format you choose, the Output File settings will look the same.

Output File is where you’ll name your recordings and select where they will be saved. You have a number of choices when it comes to save location, including parallel to your project, inside your project’s assets, in a temporary cache or in a user-defined directory.
The naming structure uses a token system (called “Wildcards” here) which will be familiar to Cinema 4D users. Each Wildcard is a piece of metadata unique to the movie or image which can aid in organization of more complex projects.
You can learn more about Unity Recorder 2.5 in the Unity Manual.